Monday, August 21, 2006
Friday, August 11, 2006
Points and Patches and Splines, Oh my!
Apologies in advance to all 3D wizards. I'm trying to make this a fairly benign blog, so a lot of this post will be pretty low level.
AM uses splines (or B-splines) which should be familiar if you've used Illustrator or some other program that allows you to create line drawings with control points and tension modifiers. The only difference is now you get to worry about a third dimension, since the splines aren't limited to two.
Here are the rules for creating a "patch", or a rendered surface in AM.
1) It must consist of two or more intersecting splines.
2) It must consist of three, four or (special case) 5 control points.
A few illustrations will draw out the subtleties (get it? "Draw" out? Oh, never mind).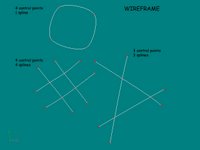
Here's an illustration of several ways you might arrange splines to make a figure. This is how you see splines in the modeler in wireframe mode. So far so good.
The first rule is the one that gets people in trouble right off the bat. The first instinct is to start dragging your mouse around and lay down a circle of four points. Sounds good, but then you render and nothing's there! The problem: an unbroken circle of points is a single spline. It won't render. You need to break the circle into 2 splines.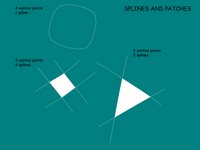
The second drawing points this out. This is how the patches will render. I've overlaid the wireframe for reference. The 3 and 4 point patches are evident. You can model everything with 3 point patches, but then that's just using a triangular polygonal modeler and you might as well buy a used copy of Lightwave 2.0. It's the 4 point patches that give you control over detailed curved surfaces. Three point patches lead down the road to unwanted creases, and are best left to hidden areas of the model.
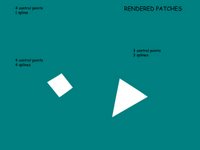 Here is the patches as they render. Notice that not only is the single spline patch not visible, neither are the parts of the splines that don't result in a 3 or 4 point patch. This can come in handy (although some count this as sloppy modeling, I still use the trick on occasion). We'll see this in the teapots.
This is a pretty simplistic overview, and leaves out a great deal of detail, but you should get the point.
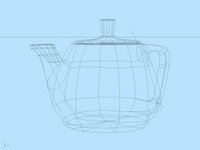 Here are a set of renders of a teapot (imagine that). The wire frame shows that this is a fairly low point set model, even though the curvature of the teapot is quite complex (and yes, I see some of the artifacts in the model. Its the age old trade off of detail vs. complexity.) This model serves quite well if it fill less than 25% of the screen (as most props do). Look closely and you'll see a couple of splines that dead end in space. I use them to tweak the curvature of the line without adding a lot of extra control points. Bad modeling, maybe, but it works.
 The next two images are the final render. The first image is a standard shader with 3 point lighting. It renders pretty quick, and is the most useful render mode. (I also use cartoon shading a lot, but objects with complex features like the teapot don't stand out well.) The last image is the same setup, but with a single key light and the Ambient Occlusion feature turned on. This drives the render time up dramatically, but produces a very natural lighting scheme. A lot of renders using AO remind me of clay or plastic models on display.
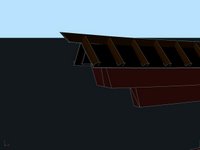
That does it for the basics of how AM models. I'll finish with a detailed image of the tori's roof, showing the log-like features I mentioned in an earlier post.
kgh
AM uses splines (or B-splines) which should be familiar if you've used Illustrator or some other program that allows you to create line drawings with control points and tension modifiers. The only difference is now you get to worry about a third dimension, since the splines aren't limited to two.
Here are the rules for creating a "patch", or a rendered surface in AM.
1) It must consist of two or more intersecting splines.
2) It must consist of three, four or (special case) 5 control points.
A few illustrations will draw out the subtleties (get it? "Draw" out? Oh, never mind).

Here's an illustration of several ways you might arrange splines to make a figure. This is how you see splines in the modeler in wireframe mode. So far so good.
The first rule is the one that gets people in trouble right off the bat. The first instinct is to start dragging your mouse around and lay down a circle of four points. Sounds good, but then you render and nothing's there! The problem: an unbroken circle of points is a single spline. It won't render. You need to break the circle into 2 splines.

The second drawing points this out. This is how the patches will render. I've overlaid the wireframe for reference. The 3 and 4 point patches are evident. You can model everything with 3 point patches, but then that's just using a triangular polygonal modeler and you might as well buy a used copy of Lightwave 2.0. It's the 4 point patches that give you control over detailed curved surfaces. Three point patches lead down the road to unwanted creases, and are best left to hidden areas of the model.
 Here is the patches as they render. Notice that not only is the single spline patch not visible, neither are the parts of the splines that don't result in a 3 or 4 point patch. This can come in handy (although some count this as sloppy modeling, I still use the trick on occasion). We'll see this in the teapots.
This is a pretty simplistic overview, and leaves out a great deal of detail, but you should get the point.
 Here are a set of renders of a teapot (imagine that). The wire frame shows that this is a fairly low point set model, even though the curvature of the teapot is quite complex (and yes, I see some of the artifacts in the model. Its the age old trade off of detail vs. complexity.) This model serves quite well if it fill less than 25% of the screen (as most props do). Look closely and you'll see a couple of splines that dead end in space. I use them to tweak the curvature of the line without adding a lot of extra control points. Bad modeling, maybe, but it works.
 The next two images are the final render. The first image is a standard shader with 3 point lighting. It renders pretty quick, and is the most useful render mode. (I also use cartoon shading a lot, but objects with complex features like the teapot don't stand out well.) The last image is the same setup, but with a single key light and the Ambient Occlusion feature turned on. This drives the render time up dramatically, but produces a very natural lighting scheme. A lot of renders using AO remind me of clay or plastic models on display.
That does it for the basics of how AM models. I'll finish with a detailed image of the tori's roof, showing the log-like features I mentioned in an earlier post.

kgh
Thursday, August 10, 2006
Model Fight update 0810
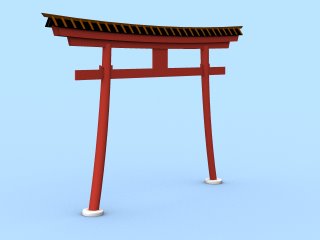 Since I've been using stock photos instead of sketches, I don't have much in the way of concept art to blog about. However, here is the rough cut of the "tori", which is the entrance
gate to many religious sites throughout Asia. It is not unheard of for a shrine to have a number of these (usually donated by wealthy individuals), and one such arrangement appears in "Lost in Translation". The reddish-orange color is traditional, although I don't know why. It's not a requirement, but when you see a tori painted, its almost always this color. The square feature between the horizontal pieces is reserved for a plaque or inscription unique to the site.
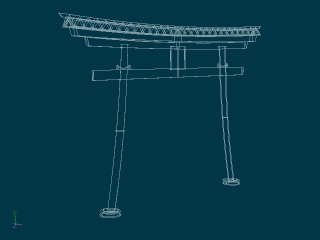
One of the big hurdles in using AM for most people is the modeler. I'll confess that I was limited to using the supplied models for a few weeks before I caught on to how the splines worked, and the rules for what was visible and what was note when patching them together. Once you get the hang of it, you can make some very graceful models with very few control points ( I shudder to think how much work it would have taken to do this with triangular polygons in Lightwave 1.0!) You've probably already noticed that the majority of control points are taken up by the detail on the roof line. It was a case where bump maps and other shortcuts weren't going to do that job. Still, its a pretty small model considering the detail.
Next blog: splines, patches, and other AM voodoo.
kgh
Sunday, August 06, 2006
Model Fight '06
Now for the main reason to start a blog--Model Fight '06! "And what is Model Fight 06?" you might ask. Well, the first rule of Model Fight is that you don't talk... oh, never mind, that gag was beaten to death years ago. Basic premise: join in with one or more like-minded 3D enthusiasts to sharpen your skills, with the added benefit of having a constant chorus of "why don't you get off your lazy backside" when you stop posting progress notes.
Already well underway, the models I'll be going up against are Dallas' Bank of America Plaza and a Robotics factory. And what could possibly complement this theme better than a Shinto shrine? Well, a lot of things, I guess, but the influence of natural lines and elements will help show off the modeling pros and cons of my chosen software, Animation Master. I made this choice because 1) AM is fun to model with, albeit with a bit of a learning curve, and B) its the only 3D package I've kept current over the years (too much cash to keep Lightwave, Maya, et al, up to date). If you've never head of Animation: Master, then I hope to do it justice. If you have, then perhaps I can cast aside some of the more common misconceptions about it.
In relation to the other models, I obviously won't have a blueprint to work with, nor an opportunity to inspect a specific shrine up close. To that end, I've taken the liberty of interpreting the rules so that I'll be modeling a generic shrine, not one in particular. I'll also keep the detail of the grounds of the shrine to a minimum, since this can vary from a simple pebble courtyard to a centuries old garden complex. It will have the items that make it obviously a shrine, such as the torii, toro, honden, chozuya, etc. (hey, go google them for yourself).
So let the games begin!
kgh
Thursday, August 03, 2006
Salutations, etc.
Welcome to my own little piece of the 'net, or as people of a certain age call it, that #%@! intraweb. (I also detest those young kids with their loud music and hoola hoops, but I digress). Hope that you have a nice friendly visit. Just clean up after yourself and be careful what you touch (after all, you don't know where this blog has been, do you?)
In case you're wondering about the name, it was the best I could think of in 30 seconds, and all the good ones like "cranberry blog" or "London blog" were either taken or had no real connection to me at all (although I can type in a British accent, govna'...) If you know of the "Legend of Boggy Creek" in either its film or folklore form, then you can guess I hail from the dark, festering woods of Louisisana/Arkansas. And if you didn't know, then forgive me for inserting this forgettable piece of Americana into your long term memory http://en.wikipedia.org/wiki/The_Legend_of_Boggy_Creek .
What you'll get here is a smattering of amateur animation, 3D modeling, and other arcanum as I see fit. I've also done some writing, but I doubt that a blog is any place for that sort of thing.
Anyway, enjoy the show, and don't forget to tip.
kgh
Subscribe to:
Comments (Atom)
