Apologies in advance to all 3D wizards. I'm trying to make this a fairly benign blog, so a lot of this post will be pretty low level.
AM uses splines (or B-splines) which should be familiar if you've used Illustrator or some other program that allows you to create line drawings with control points and tension modifiers. The only difference is now you get to worry about a third dimension, since the splines aren't limited to two.
Here are the rules for creating a "patch", or a rendered surface in AM.
1) It must consist of two or more intersecting splines.
2) It must consist of three, four or (special case) 5 control points.
A few illustrations will draw out the subtleties (get it? "Draw" out? Oh, never mind).
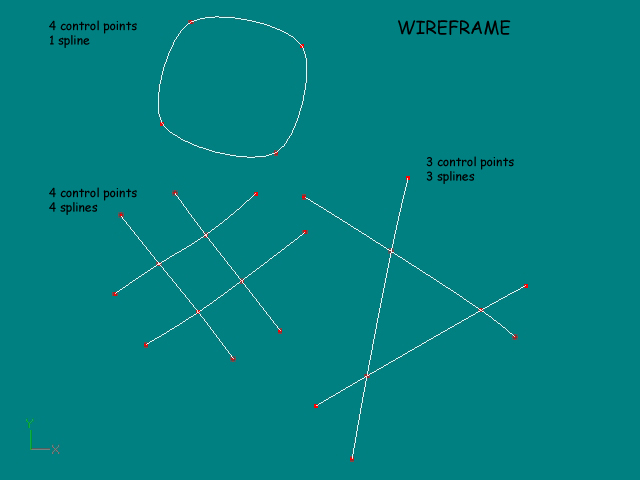
Here's an illustration of several ways you might arrange splines to make a figure. This is how you see splines in the modeler in wireframe mode. So far so good.
The first rule is the one that gets people in trouble right off the bat. The first instinct is to start dragging your mouse around and lay down a circle of four points. Sounds good, but then you render and nothing's there! The problem: an unbroken circle of points is a single spline. It won't render. You need to break the circle into 2 splines.
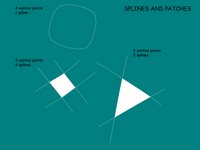
The second drawing points this out. This is how the patches will render. I've overlaid the wireframe for reference. The 3 and 4 point patches are evident. You can model everything with 3 point patches, but then that's just using a triangular polygonal modeler and you might as well buy a used copy of Lightwave 2.0. It's the 4 point patches that give you control over detailed curved surfaces. Three point patches lead down the road to unwanted creases, and are best left to hidden areas of the model.

Here is the patches as they render. Notice that not only is the single spline patch not visible, neither are the parts of the splines that don't result in a 3 or 4 point patch. This can come in handy (although some count this as sloppy modeling, I still use the trick on occasion). We'll see this in the teapots.
This is a pretty simplistic overview, and leaves out a great deal of detail, but you should get the point.
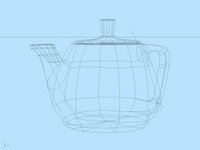
Here are a set of renders of a teapot (imagine that). The wire frame shows that this is a fairly low point set model, even though the curvature of the teapot is quite complex (and yes, I see some of the artifacts in the model. Its the age old trade off of detail vs. complexity.) This model serves quite well if it fill less than 25% of the screen (as most props do). Look closely and you'll see a couple of splines that dead end in space. I use them to tweak the curvature of the line without adding a lot of extra control points. Bad modeling, maybe, but it works.

The next two images are the final render. The first image is a standard shader with 3 point lighting. It renders pretty quick, and is the most useful render mode. (I also use cartoon shading a lot, but objects with complex features like the teapot don't stand out well.) The last image is the same setup, but with a single key light and the Ambient Occlusion feature turned on. This drives the render time up dramatically, but produces a very natural lighting scheme. A lot of renders using AO remind me of clay or plastic models on display.

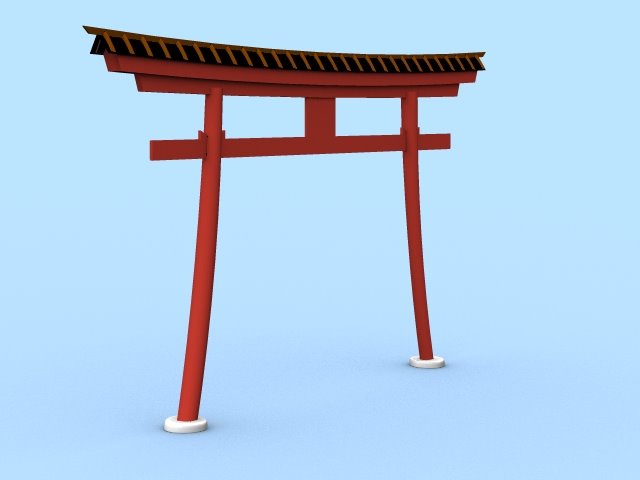
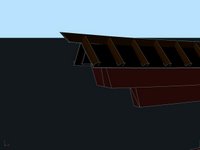
That does it for the basics of how AM models. I'll finish with a detailed image of the tori's roof, showing the log-like features I mentioned in an earlier post.
kgh
 Things to note: 1) Shrine is on a mountainside, a common occurrence for a rural structure. 2) There is a courtyard leveled out from the surrounding contour, and it is normally enclosed by a fence made of wood or stone (not shown in this view). 3) There is a building for lodging, etc., outside the courtyard and connected by a wooden walkway. This are can also include vegetable gardens, etc. 4) The tori is not shown, but stands where the entrance stairs reach the courtyard level. 5) Other details are still in the planning stages, such as the placement of other temizuya and komainu (clensing station and statues).